Let’s get developing
After building up lots of tooling for classic Macintosh, we can develop a full application: Messages for Macintosh.
If you’re stumbling on this article without context, you might want to start with these to get up to speed:
- A simplified guide to classic Macintosh development using Retro68 and pce-macplus
- Introducing CoprocessorJS
- Introducing Nuklear for Macintosh
The motivation
This is the developer-oriented companion article to the Messages for Macintosh introduction post. If you’re stumbling upon this just wanting to get Messages for Macintosh up and running, click over there.
What is Messages for Macintosh?
Messages for Macintosh is a new software suite for classic Macintosh systems to interoperate with Apple iMessages via a familiar interface, with supporting software running on a newer Mac computer. Messages for Macintosh is built with:
- CoprocessorJS, which handles allowing the classic Macintosh hand off nodejs-based workloads over its serial port to run on another machine
- Nuklear, a heavily modified version of nuklear targeted at classic Macintosh systems
- serialperformanceanalyzer, a library I built for assisting with the performance modification necessary to get Nuklear usable
- Retro68, a GCC-based cross compilation env for classic Macintosh systems

What is the purpose of this article?
The purpose of this article is to outline how to run the development work flow for getting a classic Macintosh system to send and receive iMessages with a familiar interface, just like what you would get on new Mac, iPhone, iPad, etc. This article will outline the developer-oriented path using a single machine and emulated classic Macintosh. If you want simple instructions to get up and running with Messages for Macintosh, see here.
System Requirements + pre-requisites
- A “modern” Mac, capable of sending and receiving iMessages through Messages.app. I tested this using an M1 Mac Mini running macOS Monterey. With tweaks, this should be able to support any version of macOS capable of sending/receiving iMessages
- A function Retro68 development environment with functional serial port communications. Like the one I outlined here – I recommend running this whole thing in UTM on your “modern” Mac so you can keep this entire workflow on one machine, just like in my post
Setting up your “modern” Mac to run iMessage Server
We need to install some custom-developed server software on our modern Mac, giving us hooks into its iMessage send/receive capabilities. We should install the Server via its git repo. This is a plain old JavaScript nodejs application implementing a very small GraphQL API. The git repo contains detailed installation instructions, but essentially you’ll be doing:
1 | git clone git@github.com:CamHenlin/imessagegraphqlserver.git |
developer note: you can edit imessagegraphqlserver as needed from here!
and allowing a couple of permissions requests.
Once you’re up and running, the iMessage Server software will display the IP addresses that it’s listening on in the top left corner, like this:
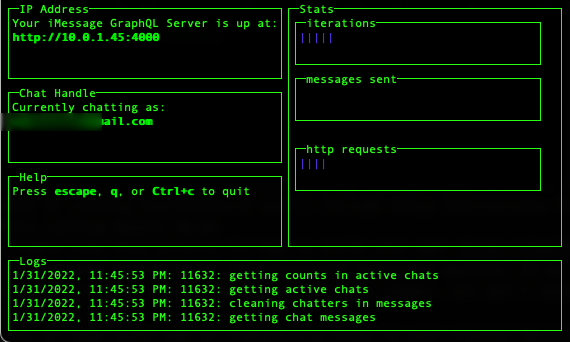
Here you can see mine is 10.0.1.45. Save your IP address for later.
Setting up your CoprocessorJS development environment
Next, we need to get up and running with the software that will handle communication between our classic Macintosh and our modern Mac. CoprocessorJS is outlined in depth here as well as at its readme file.
CoprocessorJS will handle serial communication with our classic Macintosh and will execute workloads on the Macintosh’s behalf, allowing it to communicate over a network with our modern Mac. Because of the varied machines that you might run this on, I opted not to create a downloadable package and will instead walk you through how to run Coprocessor from source for now. More in depth instructions and explanation is available at the coprocessor repo’s readme.
Running CoprocessorJS
Here is how to quickly get up and running with CoprocessorJS. In a terminal window on your “intermediary” machine, which would mean inside of UTM if you are using my suggested development environment:
1 | git clone git@github.com:CamHenlin/coprocessor.js.git |
developer note: this is a great time to take a look at what CoprocessorJS is, how to use it, etc.
You should be rewarded with:
1 | instantiated program, waiting for data on /dev/tnt0 |
Getting Messages for Macintosh compiling and running in pce-macplus
Now comes the easy part. This should be done inside of your UTM VM if you are using my suggested development workflow. Essentially we need to get the Messages for Macintosh git repo in place, and then run it. If you’re seeing this without context, refer to the dev environment setup instructions.
1 | git clone git@github.com:CamHenlin/MessagesForMacintosh.git |
developer note: you can make edits to the MessagesForMacintosh directory and then build_and_run.sh to see your changesdeveloper note 2: if you make edits to the JavaScript files (which will be executed by CoprocessorJS), run ./compile_js.sh in the MessagesForMacintosh directory and restart CoprocessorJS
Your classic Macintosh VM should launch and you should see a floppy disk appear on the desktop.
Setting up Messages for Macintosh on the classic Macintosh
This is the same as the non-developer instructions. We’re in the home stretch and nearly ready to start chatting! Here are our final steps for getting up and running:
- Once the floppy appears on the desktop, open it
- Double click on
MessagesForMacintoshwhich will launch the app - The app will take a few moments to load depending on the speed of your internet connection, as it installs supporting software on the CoprocessorJS device
- After the app is done loading, you will see a new window appear titled “Enter iMessage GraphQL Server”
- Enter the IP address from the step above labelled “Setting up your “modern” Mac to run iMessage Server” in to the input and click save
- The chat window should appear with a familiar-looking interface
- Start chatting! We’re done!
Questions? Comments? Issues?
If you’ve got any questions, comments, problems, etc., please drop a comment on the page here. Heck – even if you just try it out, please post about it here. I’d love to hear about your experience!
Pull requests welcome
If you make improvements to any part of the process, feel free to submit PRs to the relevant repositories.
Did you enjoy my post?
I'm really excited about the work that I'm doing here. If you enjoyed my post and my work, please consider tipping me with a coffee. I appreciate you taking the time to read my post!