Messages for Macintosh - what is it?
Messages for Macintosh is a new software suite for classic Macintosh (System 2.0 through MacOS 9.2.2) systems to interoperate with Apple iMessages via a familiar interface, with supporting software running on a newer Mac computer.
What is the purpose of this article?
The purpose of this article is to outline how to get your classic Macintosh system set up to send and receive iMessages with a familiar interface, just like what you would get on new Mac, iPhone, iPad, etc. This article will outline the simplest path to getting up and running, without a functioning development environment. If you want more in-depth instructions involving local development workflow, see here.
System Requirements + pre-requisites
- A “modern” Macintosh, capable of sending and receiving iMessages through Messages.app. I tested this using an M1 Mac Mini running macOS Monterey.
- A network-connected machine capable of running CoprocessorJS (we’ll include setup instructions for that here) connected to your “classic” Macintosh via a serial port — a raspberry pi is a great option, but I used a 2011 i5 Mac Mini running Ubuntu 20.04
- A USB to mini din 8 RS422 serial cable (see this article for how to build your own)
- A “classic” Macintosh, with its modem serial port connected to the previously mentioned machine via the previously mentioned cable. In my case I will be using a Macintosh Classic running System 6.0.8 with 4MB of RAM, but the software has been tested in an emulator down to a Macintosh SE running System 2.0 with 1MB RAM. It is known to not run on System 1.1 due to unimplemented function calls, but may be able to run on a 512k Mac with System 2.0 or greater – if anyone tries it, let me know! I have not tested System 7 or greater but they should work fine.
- A USB floppy drive and floppy disk, or some other way of transfering files to your classic Macintosh.
- Alternatively, this is all capable of running in emulators on a single modern Mac for development and testing purposes. Running within an emulator is outlined in the companion article here.
How to run Messages for Macintosh
There are 3 major things we’re going to do to get Messages for Macintosh chatting:
- Set up our “modern” Mac
- Set up an intermediary machine to handle communication between our “classic” Macintosh and our “modern” Mac (can be the “modern” Mac itself)
- Set up our “classic” Macintosh
Let’s get started.
Setting up your “modern” Mac to run iMessage Server
We need to install some server software on our modern Mac, giving us hooks into its iMessage send/receive capabilities. It should be signed into the iMessage account that we want to access from our “classic” Mac. You can download the server software directly from this link or install it from source from this git repo. The git repo contains detailed installation instructions, but either install method on a modern Mac and granting the server requested permissions should get you moving.
Once you’re up and running, the iMessage Server software will display the IP addresses that it’s listening on in the top left corner, like this:
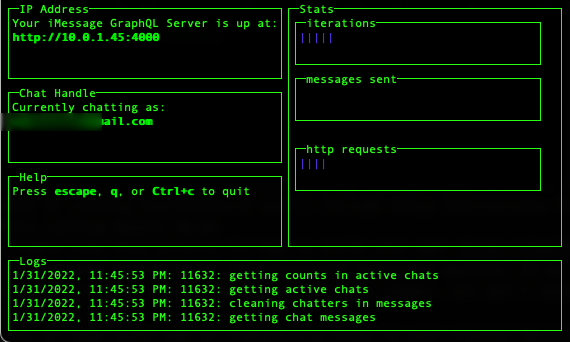
Here you can see mine is 10.0.1.45. Save your IP address for later.
Setting up your “intermediary” computer to run CoprocessorJS
Next, we need to get up and running with the software that will handle communication between our classic Macintosh and our modern Mac. We do that using CoprocessorJS running on the intermediary computer and a USB to mini din 8 RS422 serial cable (again, see this article for how to build your own). (note: the intermediary machine can be the same machine as your modern Mac, but could also be another new-ish Mac, a Linux machine, raspberry pi, etc – I am using an older Mac Mini running Ubuntu 20.04 as I test this out)
CoprocessorJS will handle serial communication with our classic Macintosh and will execute workloads on the Macintosh’s behalf, allowing it to communicate over a network with our modern Mac. Because of the varied machines that you might run this on, I opted not to create a downloadable package and will instead walk you through how to run Coprocessor from source for now. More in depth instructions and explanation is available at the coprocessor repo’s readme.
Finding your serial cable’s tty
If you’re using a new USB to serial port adapter (maybe like the one I outlined here) you may not know what port you’re running on. Here’s an easy way to figure it out:
In a new terminal window, with the USB portion of the cable unplugged from your host machine, run:
1 | output1=$(ls /dev/*) |
Then, plug in the USB portion of the cable to your host machine, and in the same terminal window, run:
1 | output2=$(ls /dev/*) |
This should output something that looks like:
1 | > /dev/ttyUSB0 |
Which is your USB to serial cable’s tty!
Running CoprocessorJS
Here is how to quickly get up and running with CoprocessorJS now that we know how to reference our serial cable. In a terminal window on your “intermediary” machine:
1 | git clone git@github.com:CamHenlin/coprocessor.js.git |
(note: the final line’s /dev/ttyUSB0 came from the “Finding your serial cable’s tty” section)
You should be rewarded with:
1 | instantiated program, waiting for data on /dev/ttyUSB0 |
Getting up and running on your classic Macintosh (finally!)
Now comes the easy part. We’re ready to set up our classic Macintosh to communicate over its serial cable, to its host machine, and then over a network, to a modern Mac, which will give us iMessage access. We’ll first load our sofware on to a floppy disk, then we’ll open it and configure it on our classic Mac.
Writing Messages for Macintosh to your floppy
You can play a similar game to what we played in “Finding your serial cable’s tty” above with your USB floppy drive if you don’t know how to access it. Just unplug/plug in the floppy disk drive with a disk loaded into it, and you should wind up with something like /dev/rdisk5, which is what my USB floppy drive happens to be on my modern Mac. Or if I run through these steps on my Linux Mac Mini, I will get /dev/sdb. Once you’ve figured out where your floppy drive is located, try this in a terminal window (replace /dev/rdisk5 with your floppy disk drive):
1 | wget https://github.com/CamHenlin/MessagesForMacintosh/raw/main/dist/MessagesForMacintosh.zip |
For reference, this process takes approximately 3 minutes with a USB floppy drive. After it’s done, eject the disk and insert it into your classic Macintosh
Setting up Messages for Macintosh on the classic Macintosh
We’re in the home stretch and nearly ready to start chatting! Here are our final steps for getting up and running:
- Plug the serial cable connected to your machine running CoprocessorJS to the modem serial port on your classic Macintosh
- Insert the floppy disk that you just created into your classic Macintosh
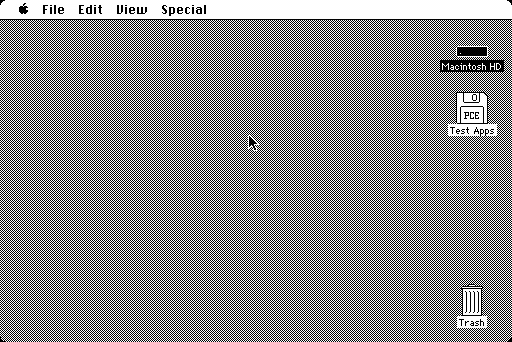
- Once the floppy appears on the desktop, open it
- Double click on
MessagesForMacintoshwhich will launch the app - The app will take a few moments to load depending on the speed of your internet connection, as it installs supporting software on the CoprocessorJS device
- After the app is done loading, you will see a new window appear titled “Enter iMessage GraphQL Server”
- Enter the IP address from the step above labelled “Setting up your “modern” Mac to run iMessage Server” in to the input and click save
- The chat window should appear with a familiar-looking interface
- Start chatting! We’re done!
Animated demo
Here is a short demo of the classic Mac app in operation:
and a shot of it running on real hardware, with some annotations:
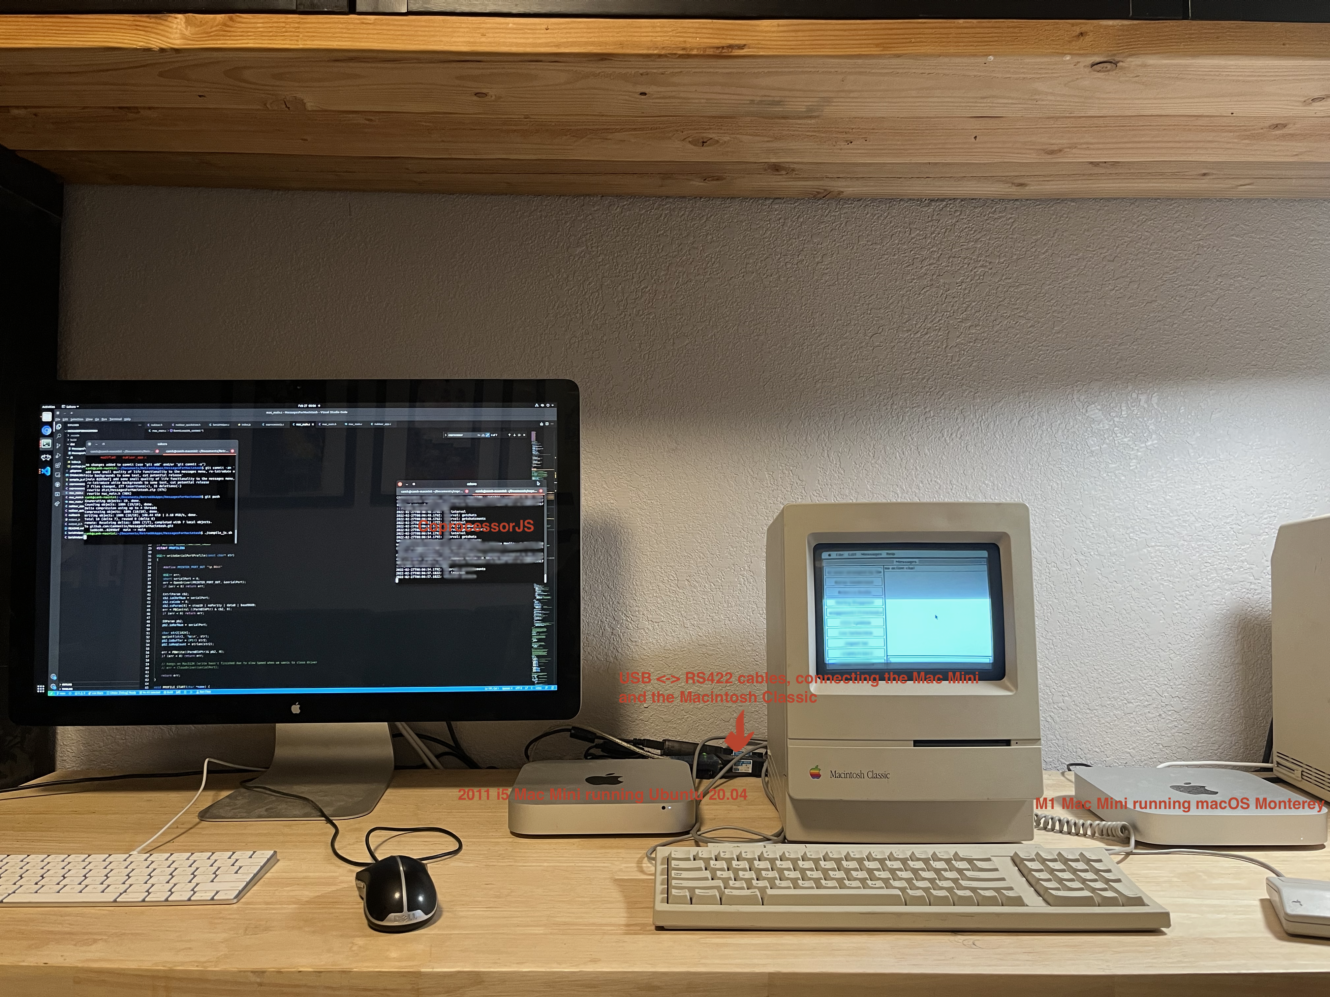
Left: i5 Mac Mini running Ubuntu, connected via serial cable to a Macintosh Classic
Right: M1 Mac Mini macOS Monterey, connected via network to the Mac Mini running Ubuntu
Questions? Comments? Issues?
If you’ve got any questions, comments, problems, etc., please drop a comment on the page here. Heck – even if you just try it out, please post about it here. I’d love to hear about your experience!
Did you enjoy my post?
I'm really excited about the work that I'm doing here. If you enjoyed my post and my work, please consider tipping me with a coffee. I appreciate you taking the time to read my post!